Firstly, let me save serious modellers time and trouble, this page is not for you, sorry. However, if you are a child, or related to a child who has a train set which is growing and want to create a sensible layout, then this is the place for you! Welcome and enjoy.
So what do I mean by a sensible layout? Well, if you get a book of track plans, whether from your manufacturer or a third party, you will very rapidly come to the conclusion that they look pretty but don't work in that you end up having to perform some very strange manoeuvers with your trains, or even have to pick them up and move them by hand. You can see this just by tracing routes with your finger. For example, having left a station platform, how does the train ever get back to it? On most layouts there will be at least one platform that you can't get back to without doing a reversal. Now, I'm not saying that real life passenger trains never reverse into a platform, but it is fairly rare, yet in the toy train world it is very common. You can work out other problems for yourselves just by tracing around diagrams with your fingers so I shan't bore you by listing them here.
All of which led me to ask the question, "is it possible to create a drivable double track layout with two destinations for a bog standard rectangular base board or table top?". As you may suspect from the fact I have created this web page, the answer was yes! I've come up with three patterns so far and there may well be more, especially if you use a different baseboard size. I've also created a few variants with slightly increasing complexity. I've listed them in order of increasing complexity to help with expanding your layout.
To create the layouts I used a freeware tool called SCARM, which you can download from the SCARM website. There is an extended version of SCARM available for $44.90 (price correct March 2023). SCARM also has an extension which allows you to simulate continental trains running on your layouts! This also comes in free and pay for versions (price $29,90, correct as of March 2023). If you pay for both then you can even run several trains in 3D! (see the above link for full details), If you want to use my layouts it is helpful to use this as it generates parts lists for you. You can also fiddle around with the layouts too! Note that to save edits to the more complex layouts you will need the pay for version of SCARM.
Being in the UK, I picked the Peco N Gauge Code 80 Settrack product range. SCARM caters for pretty well every manufacturer, gauge and code I've ever heard of, so translating these layouts to your favourite supplier and scale shouldn't be too difficult. All of the Peco layouts fit the common 5' x 3' baseboard size (yes, even though it is no longer official, we still use feet and inches for this sort of thing here in the UK!). The layouts are all based on a double track mainline, and all bar one include a circuit (because kids like to see things whizzing round!).
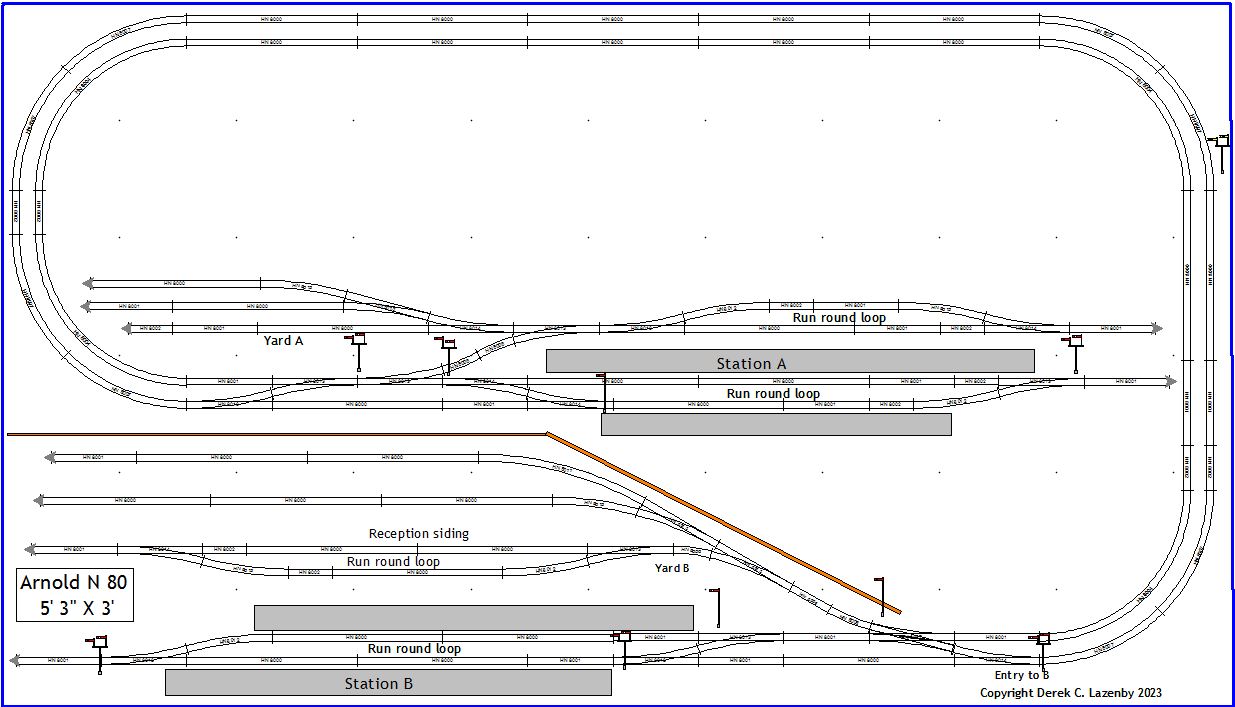
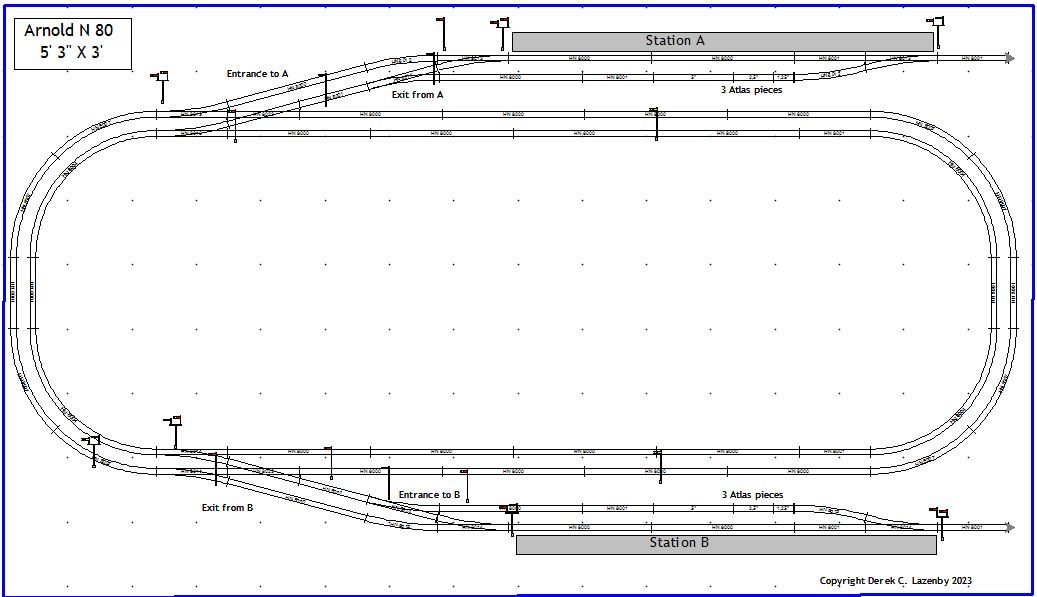
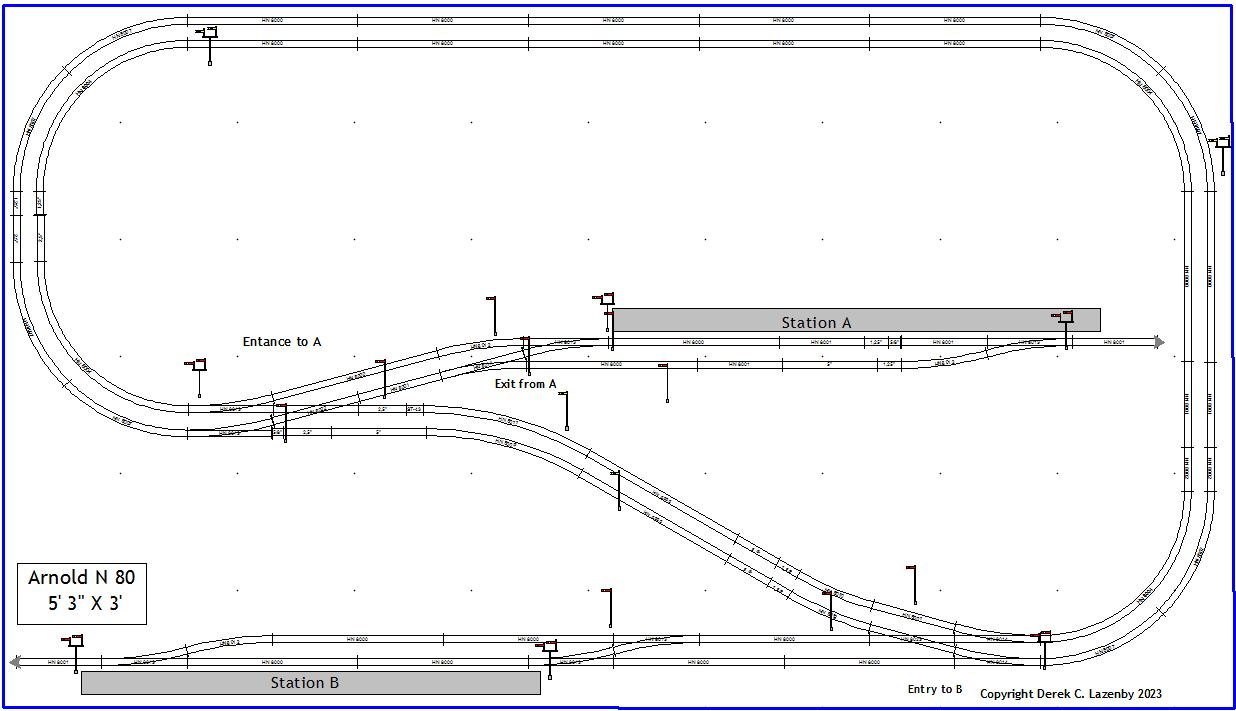
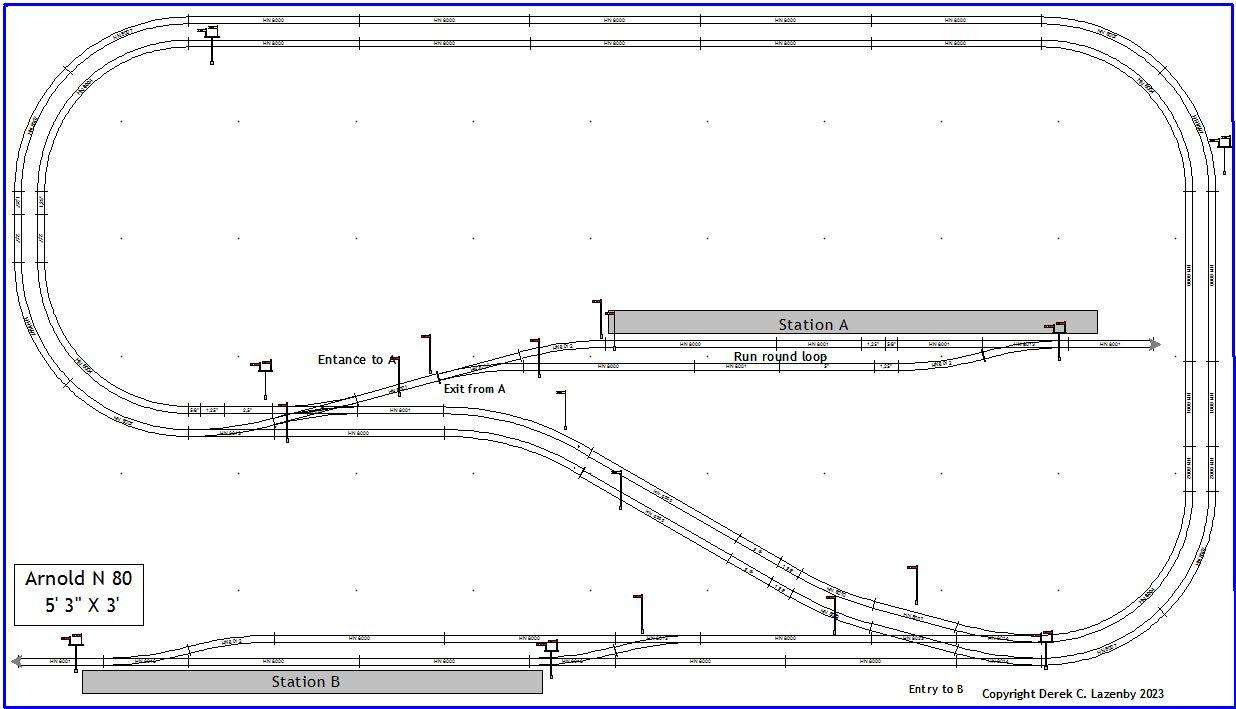
In order to illustrate how changing manufacturer can cause subtle changes to the layout, I have also created equivalent layouts using Hornby Arnold N 80 track. I did these in two versions, one close to the Peco layout, and one showing the layouts modified to utilise the Arnold Double Slip. Where a Double Slip has been used in the circuit part of the layouts, a Single Slip would have been better had it been available as switching between the main lines is unusual. As a result I've signalled those slips as though they are used only as Single Slips. The Arnold layouts need a 5'3" x 3' (' indicates feet, " indic\tes inches) baseboard as the shallower points angle would otherwise reduce the length of the run round loops. Where possible, "awkward lengths" in the Arnold layouts use the useful short straights provided by Atlas and Peco as opposed to using Flexitrack, except for a pair of curves in the five of those layouts that contain circuits due the double slip being a slightly different size to a simple crossover. The larger radius of those to curves requires a piece of flexitrack 7.95" long, the other is 7.43" long.
Each set of 3 layouts is displayed via a slideshow mechanism. The Peco layout is shown by default. You can cycle through a set by using the red chevron buttons to the sides of each image.
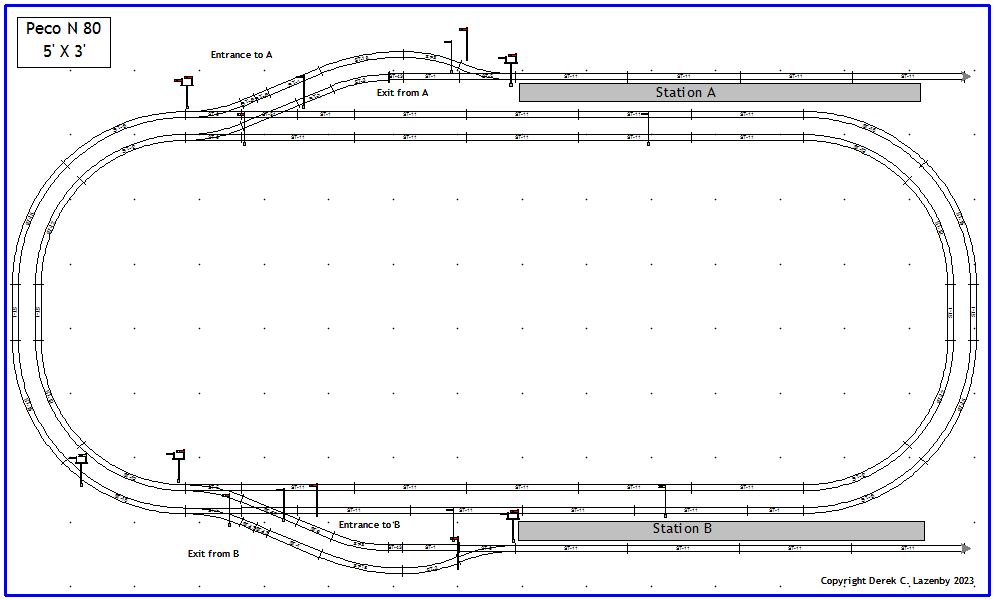
The simplest pattern has two stations outside the mainline circuit and is suitable for modern multiple unit style trains. Regardless of your national default as to whether trains drive on the left or right on a two track mainline, you can drive from Station A to Station B on your nationally correct loop and vice versa. Job done!
I've added some old fashioned UK semaphore signals to indicate the places where you may want signals, but you should please yourself as to what signalling you actually provide (especially as a: the SCARM selection is limited; and b: for the signalling I've assumed UK left hand driving on the circuits). I haven't gone as far as adding ground signals because, even if they are manufactured, SCARM has no such defined objects. You should be able to work the layout with just two simple power controllers conected to the inner and outer circuits allowing two trains to be run. Obviously that means that you must have both trains halted in the stations before switching the points for the trains to depart on the other loop. You will also need to occasionally pause trains to avoid crashes at the crossovers!
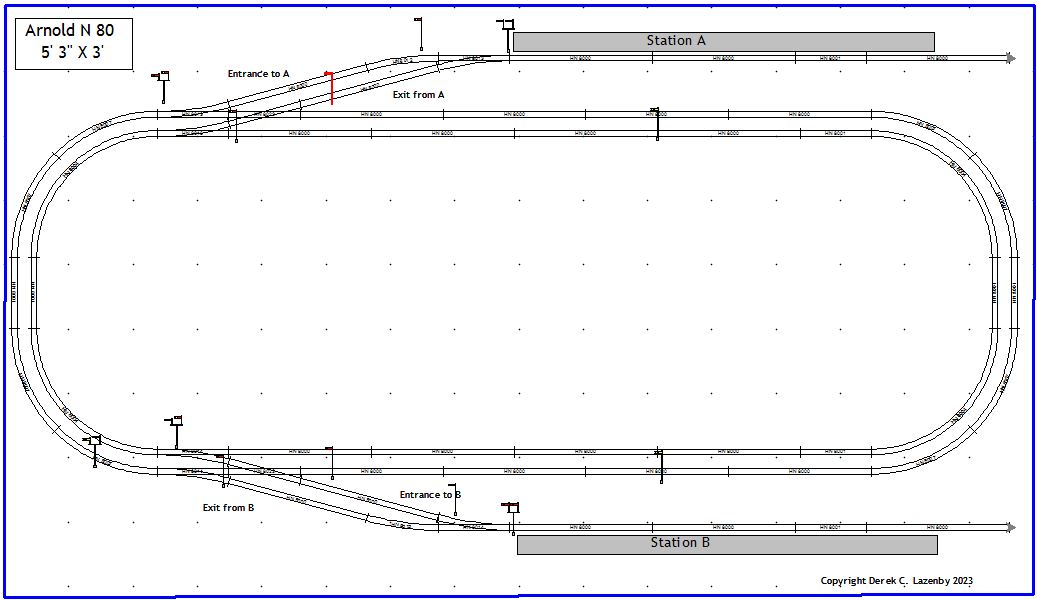
In case you prefer your stations on the inside of your layout, here is the second pattern.
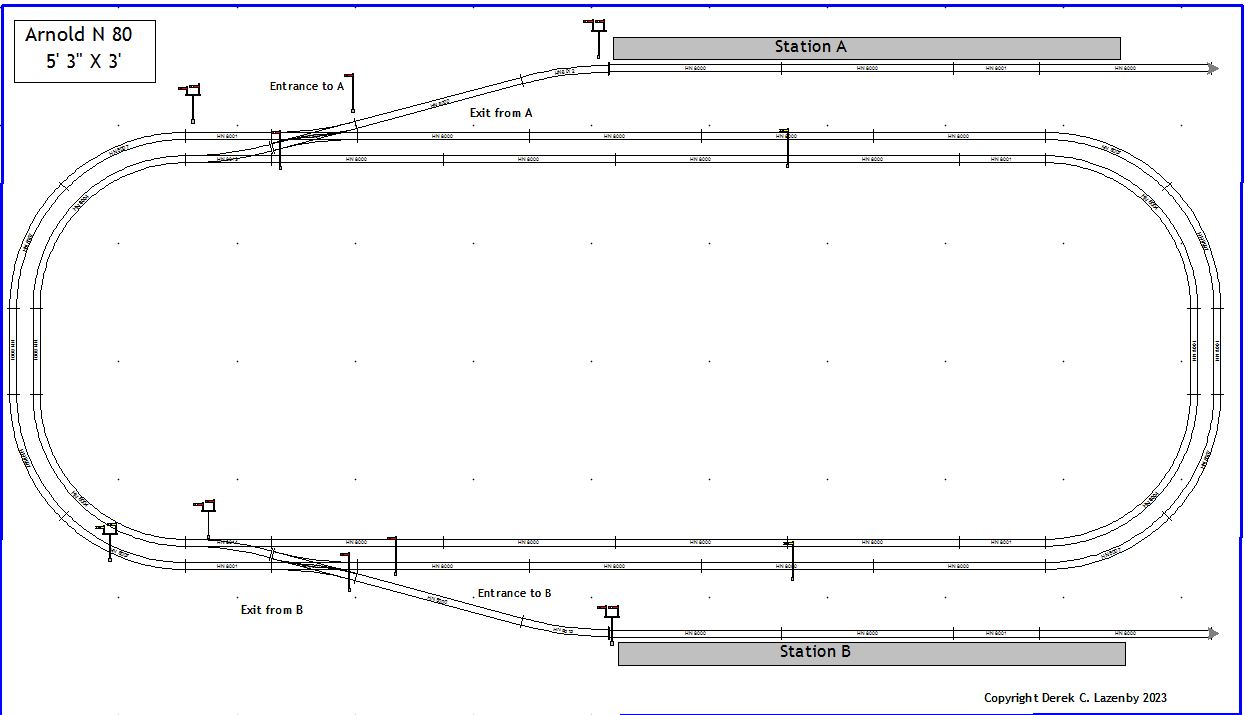
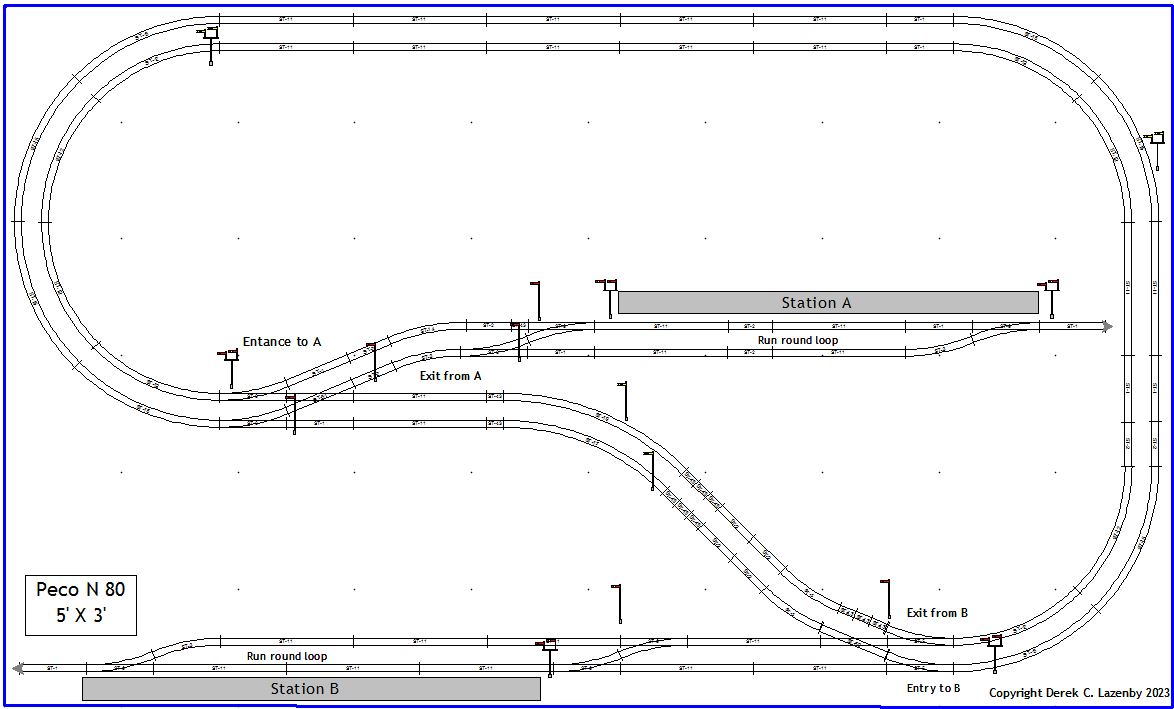
Of course, that is all well and good, but what if you have any sort of locomotive? Then adding a couple of run round loops becomes necessary as below. There is then the question as to how to perform the run round operation. If you don't mind waiting until after both trains are safely in the stations, you can still get away with just two power controllers as once you have switched all the entry and exit points, the controller which will be used for the exit and mainline can provide power to the loop. Otherwise you will have to double up on the controllers, attaching the extra controllers to the station exits. You then use these controllers only when both stations are isolated by their entry and exit points. They should obviously be off before using the main circuit controllers to exit the stations.
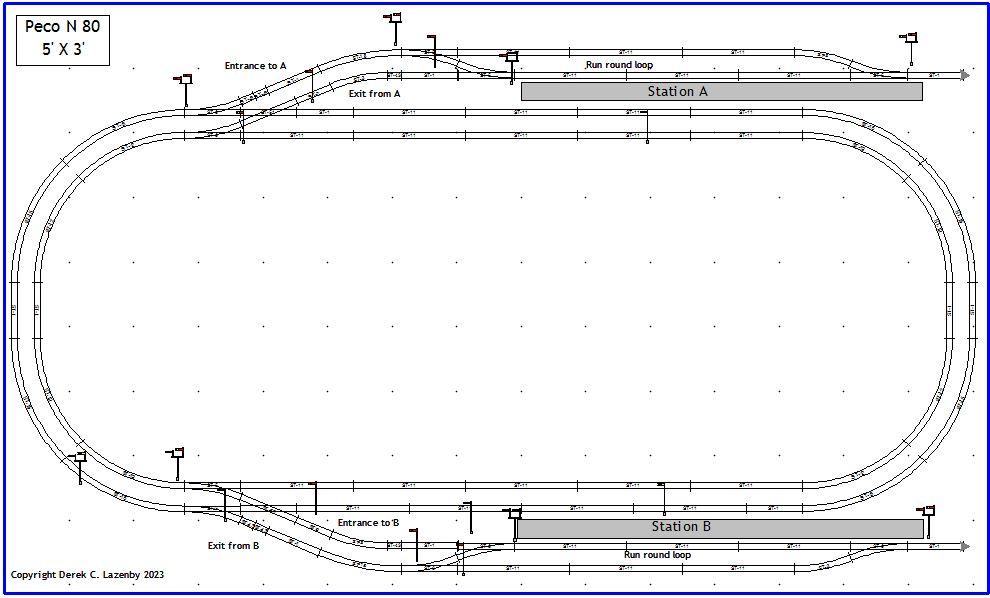
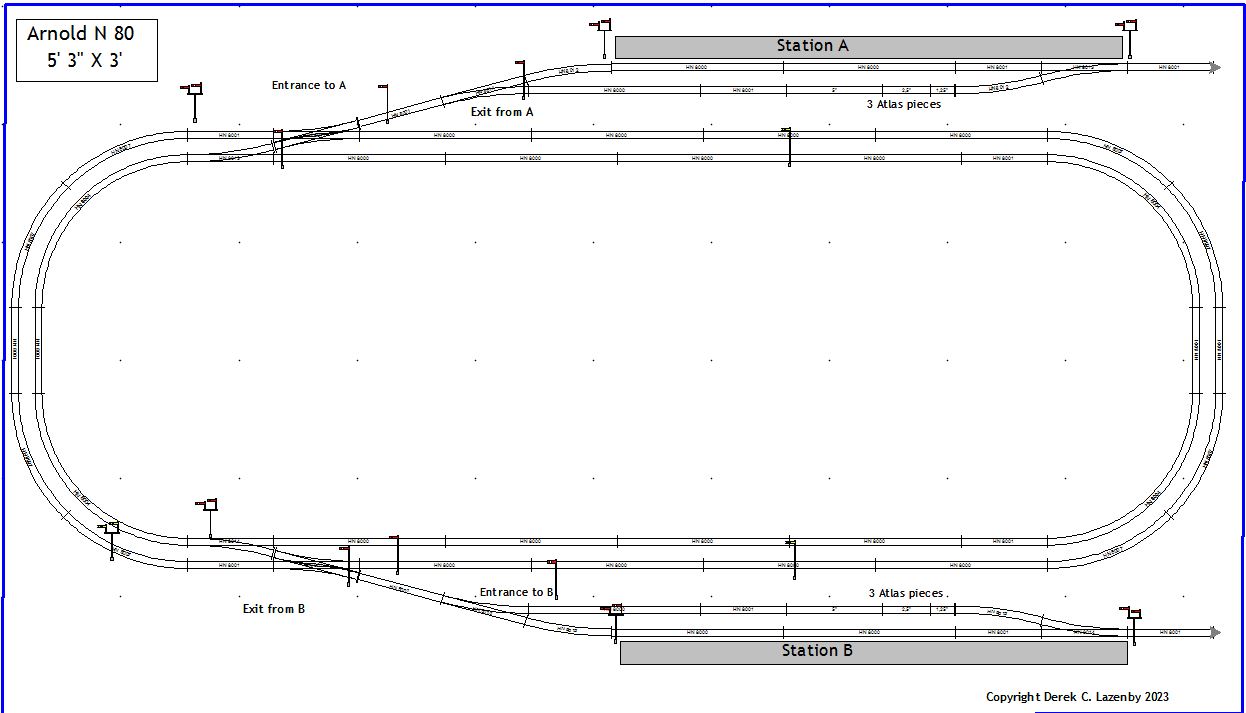
Again, here are some layouts with stations in the middle.

Well, if we are going to have two tracks in the station areas, can't we have two platforms? Not as things stand as that would break my "must be drivable" aim, because there would be no access to the opposite direction mainline from the second platform. If you really want two platforms several things must happen. Concentrating on the previous Peco layout to illustrate this, then whilst there is room for a second platform at Station A, there is not at Station B. The choice is to either use a wider baseboard, 4', or remove the straights from both edges of the mainlines. You then have to create an extra crossover in both station throats using pairs of points. This will reduce the length of trains that can be accomodated in the stations, hence you may want to extend the baseboard length from 5' to 6' and add extra straight tracks. As I'm perfectly content with a single platform, I shall leave diagrams of these layouts as a not particularly difficult exercise for the reader. Well, you did want an excuse to play with SCARM for yourself didn't you? But keep reading as eventually we get to layouts where two platforms fits the basic design.
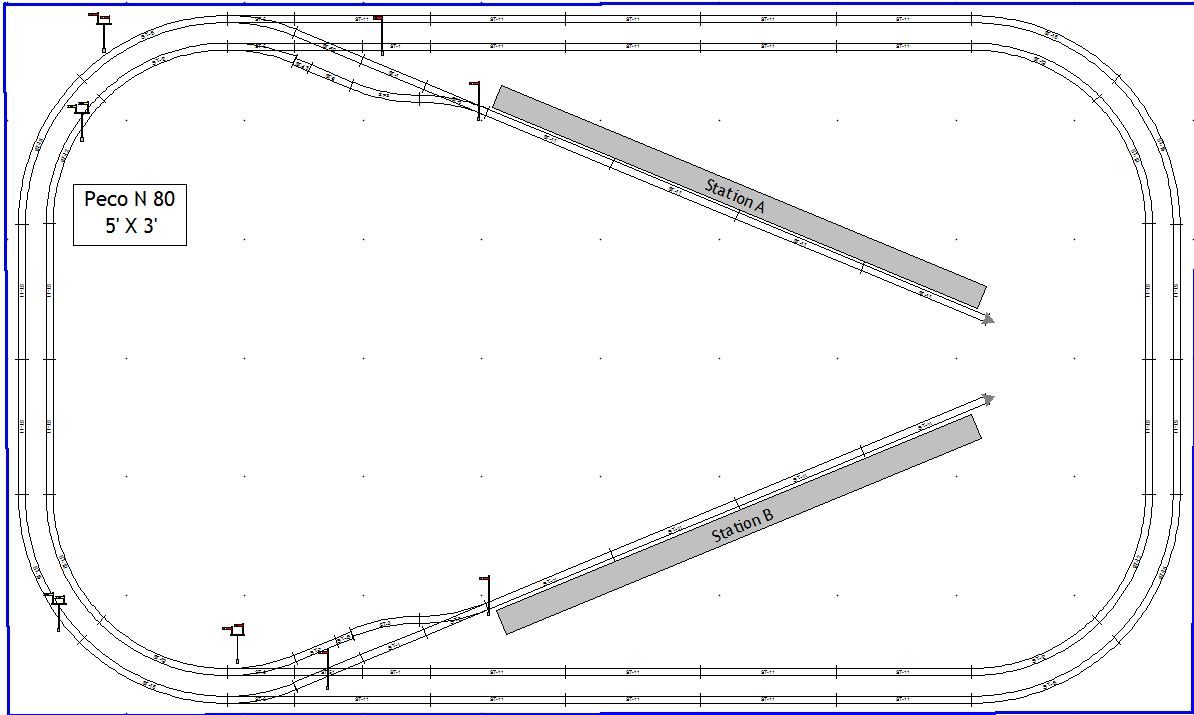
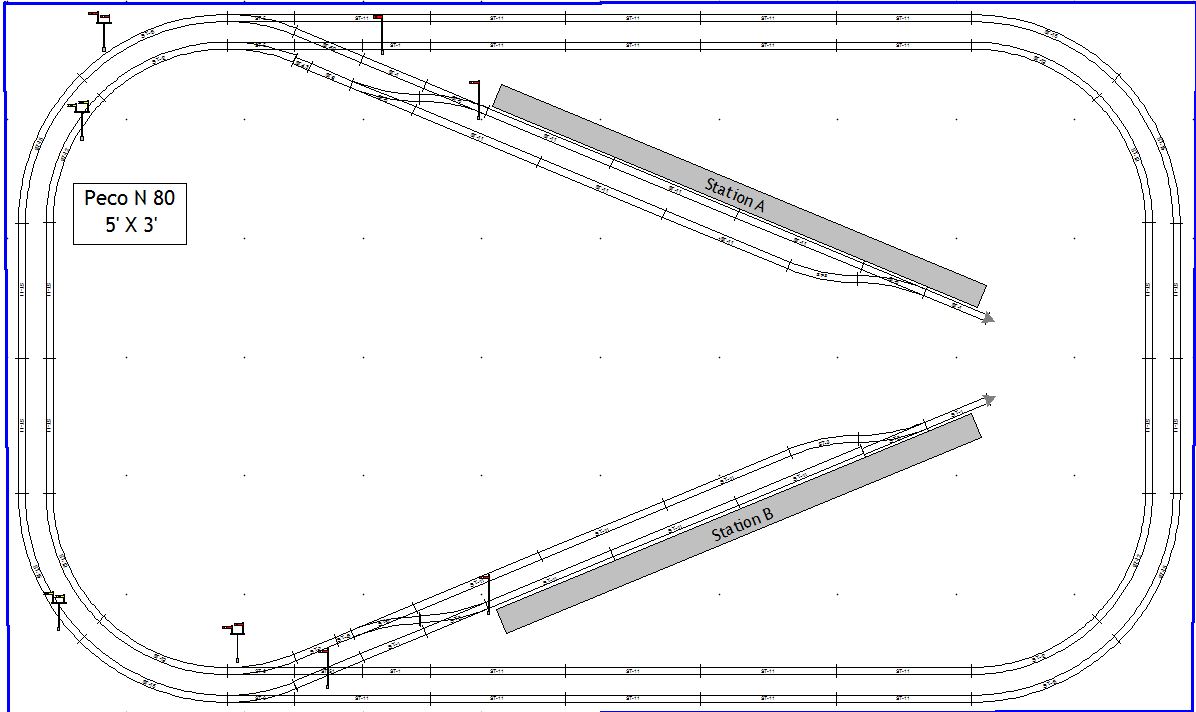
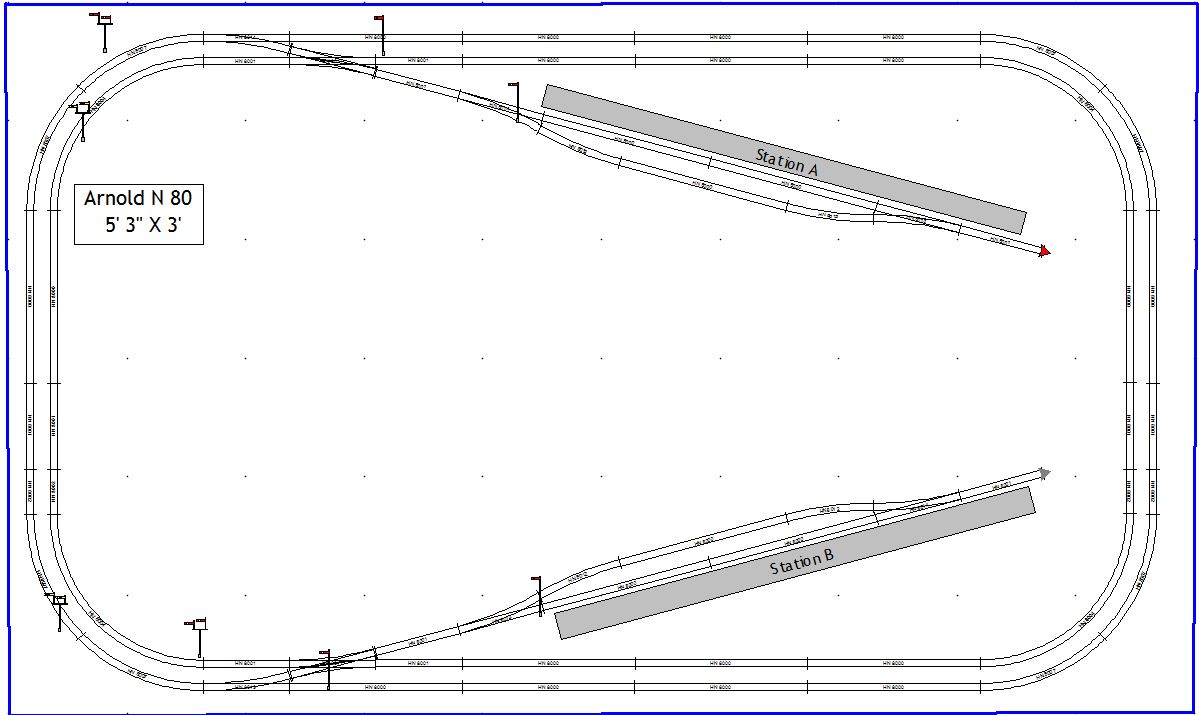
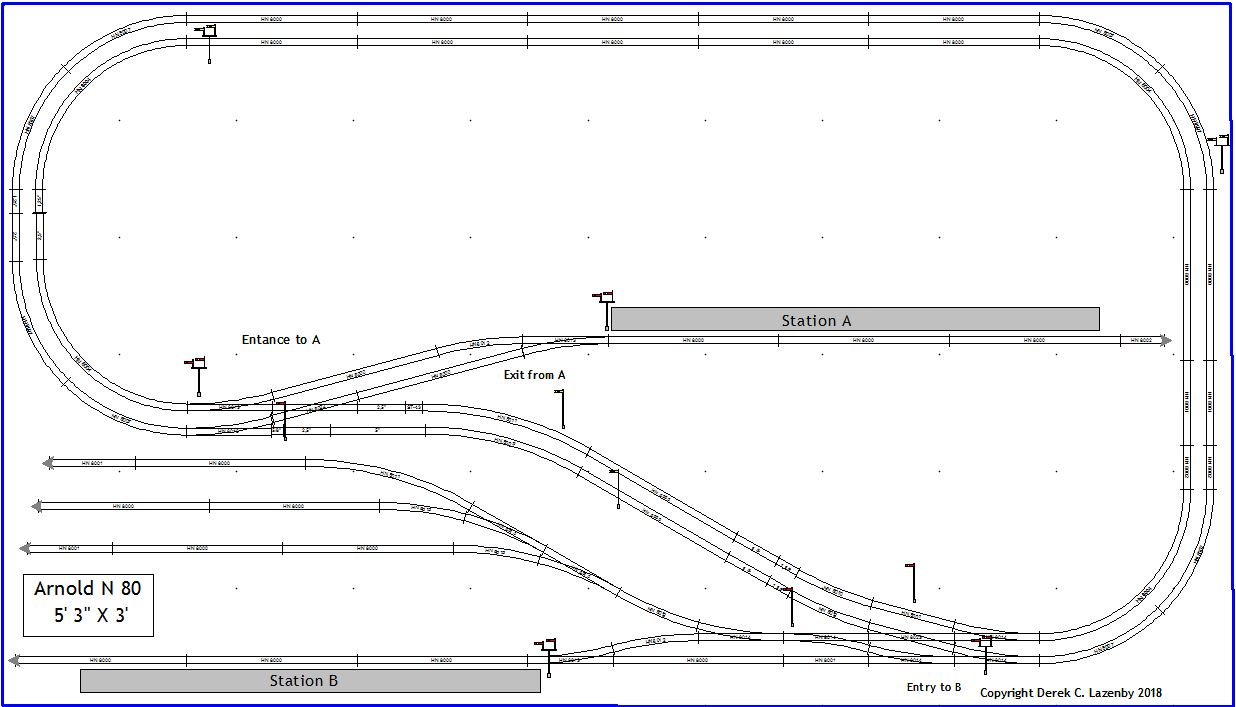
And so to the third pattern. This is derived from, but is significantly different from, a Hornby OO layout, Plan 7L, which is of course not drivable. Again I'll start with the simplest version for modern multiple unit trains. The same basic comments as for the first layout above still apply here.
It is also worth pointing out that the central parts of the mainlines can be used to isolate a train whilst another train makes a direct run between the stations using the same mainline. If you need an excuse for stopping a train then you could always add a through station on the diagonal (probably with curved platforms), however, I haven't figured out how to do that with SCARM, so you'll just have to imagine it! Another possibility would be to have a central tunnel to hide the stopped train, but again you'll have to imagine that!
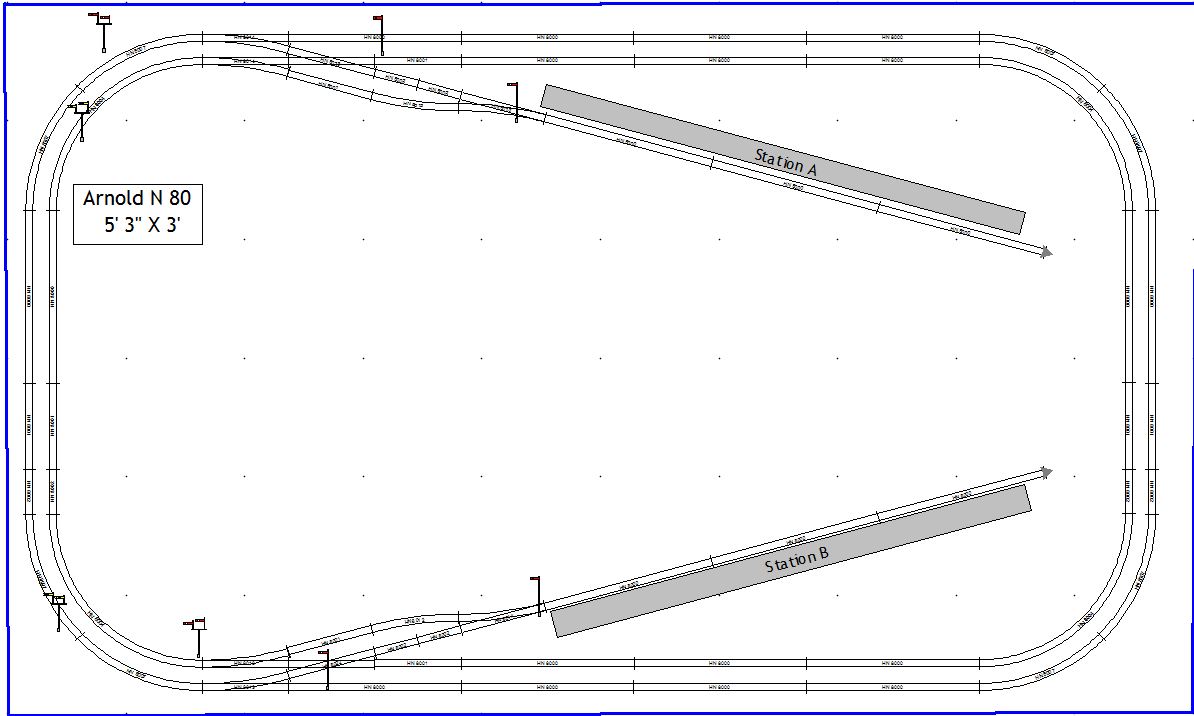
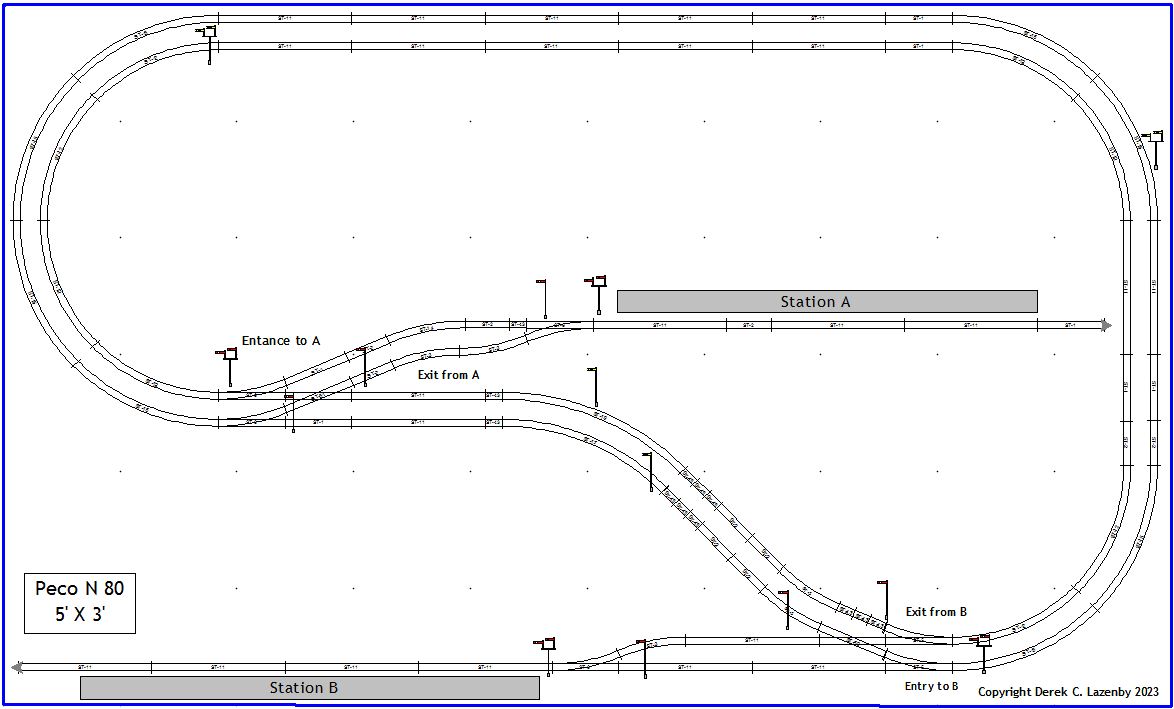
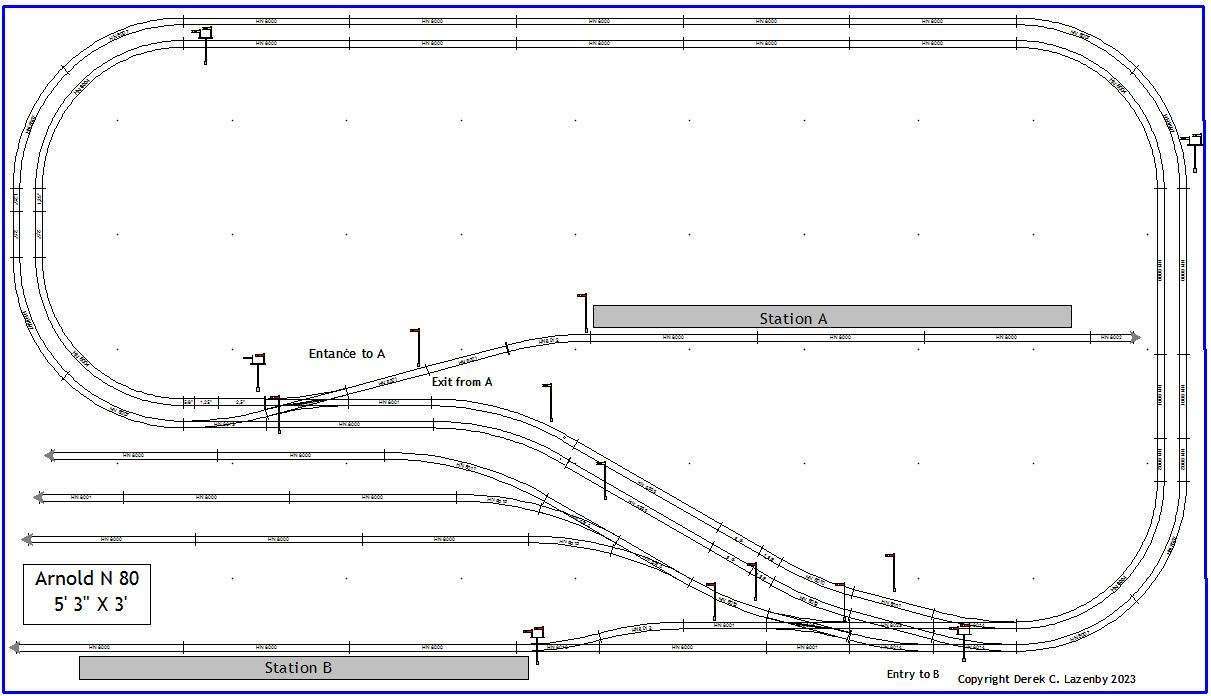
You've probably guessed what comes next! Yup, run round loops for locomotive fans. Two station addicts will immediately notice that Station B has room at it's throat to add the necessary crossover points. However, the previous comments about size still apply to Station A.
 px
px
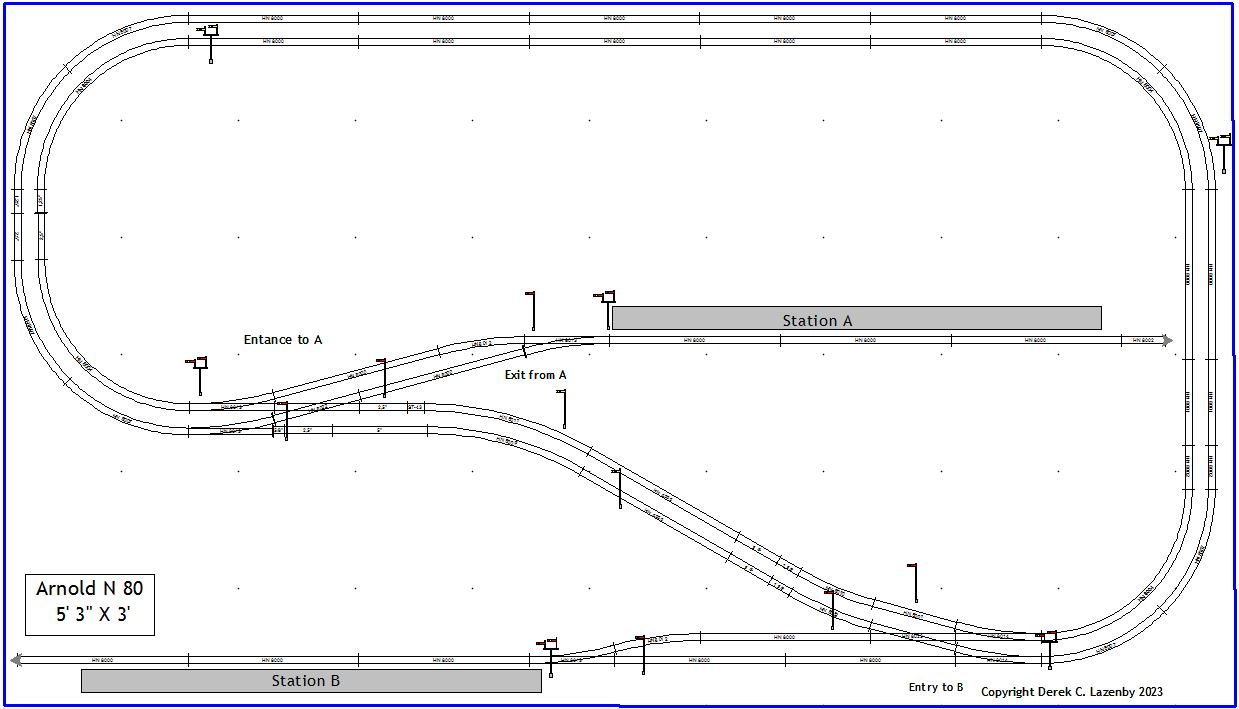
So what's next? Well, now that there is more room in the station areas, we could add some carriage sidings at Station B for the MU variant. It can be accessed by regarding movements in and out as empty stock workings which originate from Station A and return to Station A. You could use Station B for this, but shunting across two mainlines seems a bit odd!
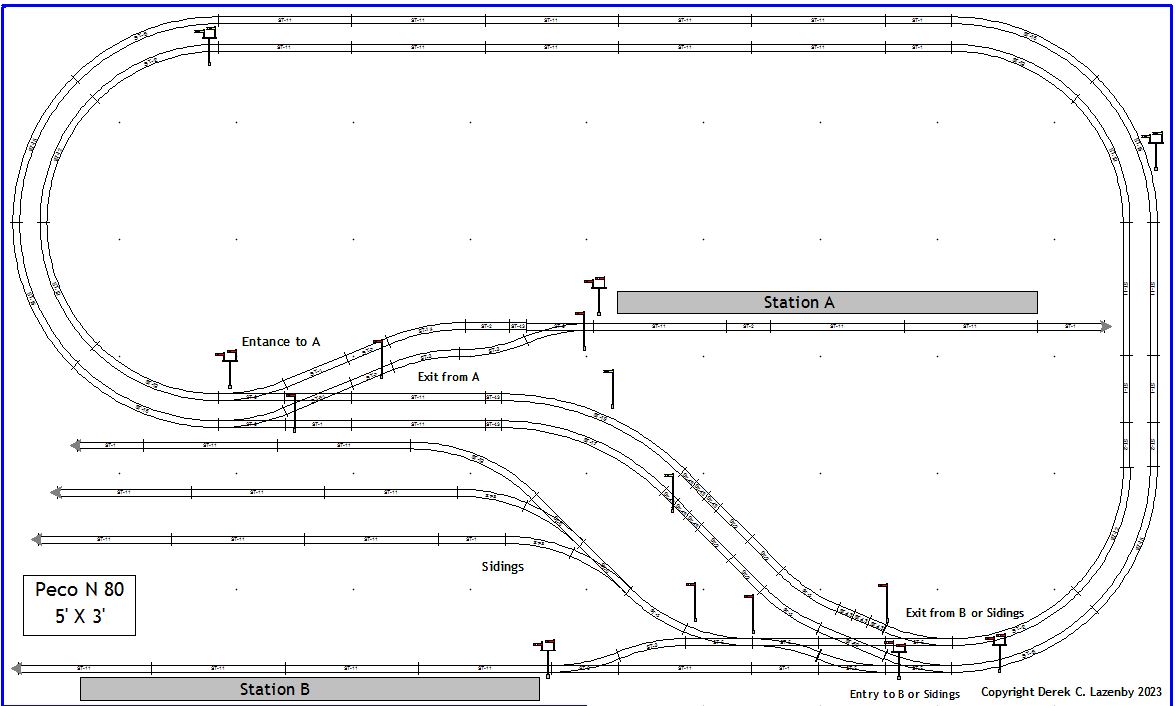
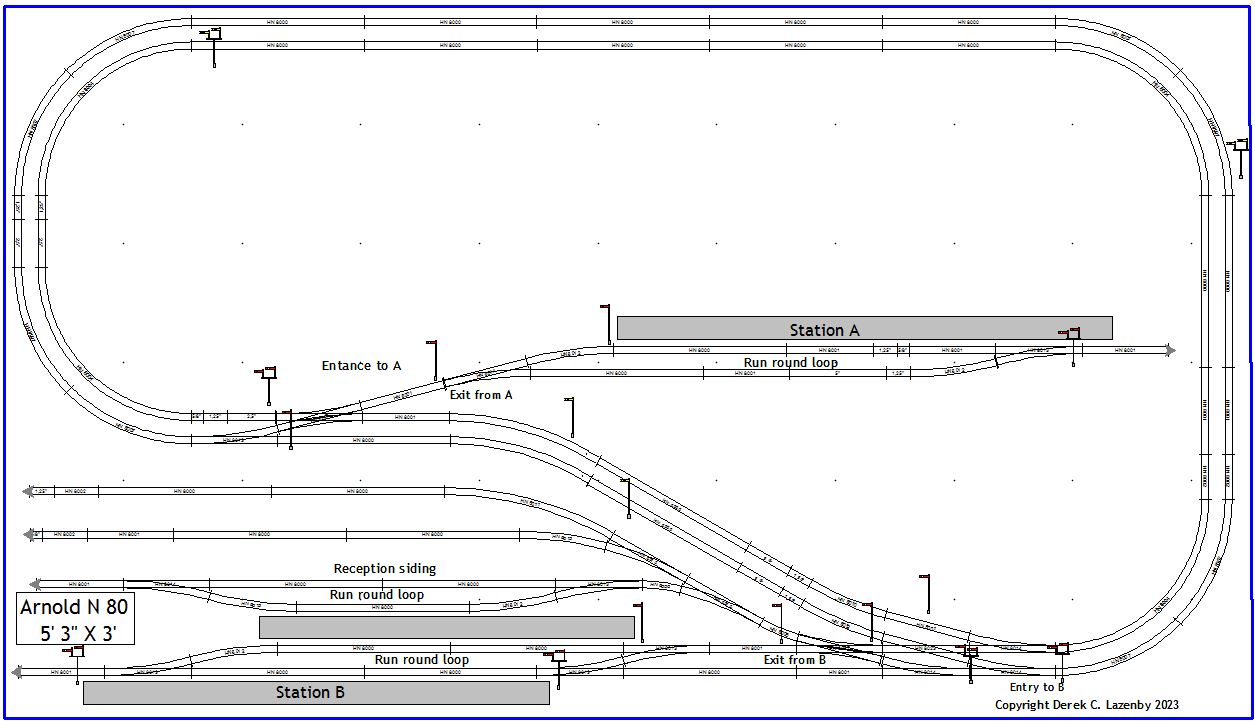
The loco version of that is slightly less satisfactory. This is because a loco pulling empty stock needs a reception siding with a run round loop which is here a bit short for the length of train you could get into one of the stations. A longer board extending the sidings towards the left would solve this of course. A controller connected near the single starter signal in Station B can control the sidings and the station. If you need extra track for shunting, don't forget the points at the throat of the station, excluding the connections to the mainlines. Given the cramped space, a better way of shunting, though taking longer, would be to split the train. For the Arnold versions, the yard entrance and reception siding are accessed via very small radius curves in order to increase the length of the run round loops.
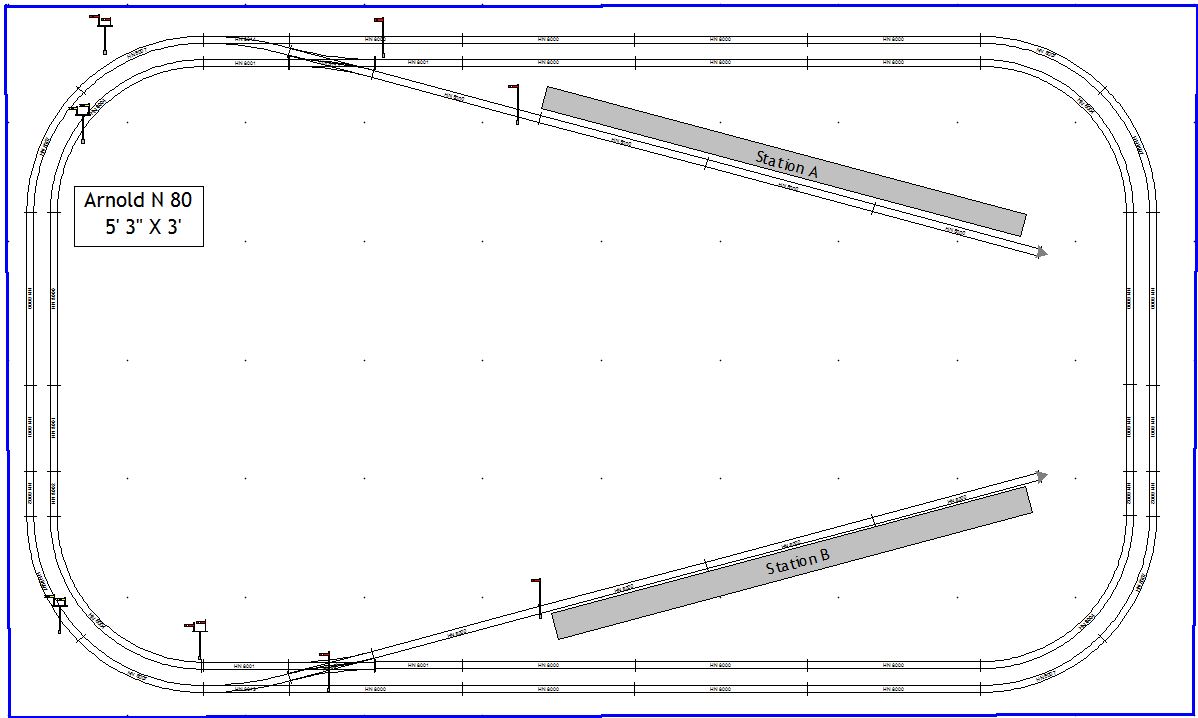
The extra points that allow access to the sidings are of course the same that are needed to allow a second platform, so that has been added. Obviously, if two trains are in Station B then the loco of the second arrival has to await the departure of the first train before it can run round.
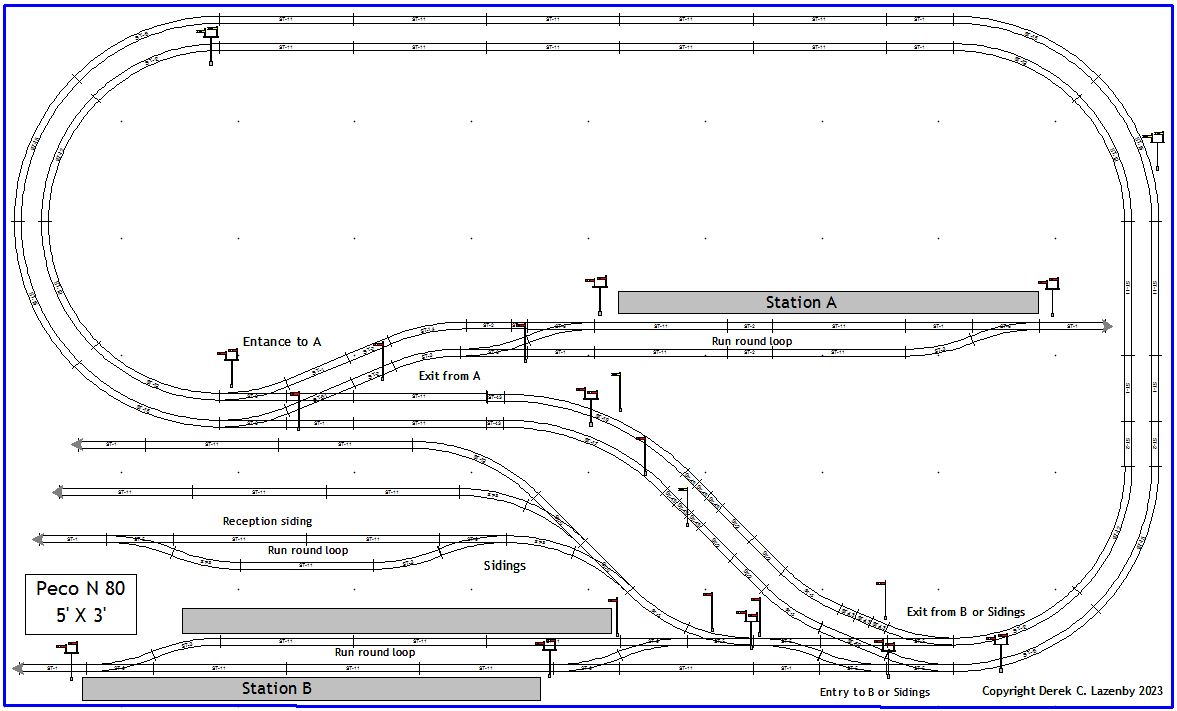
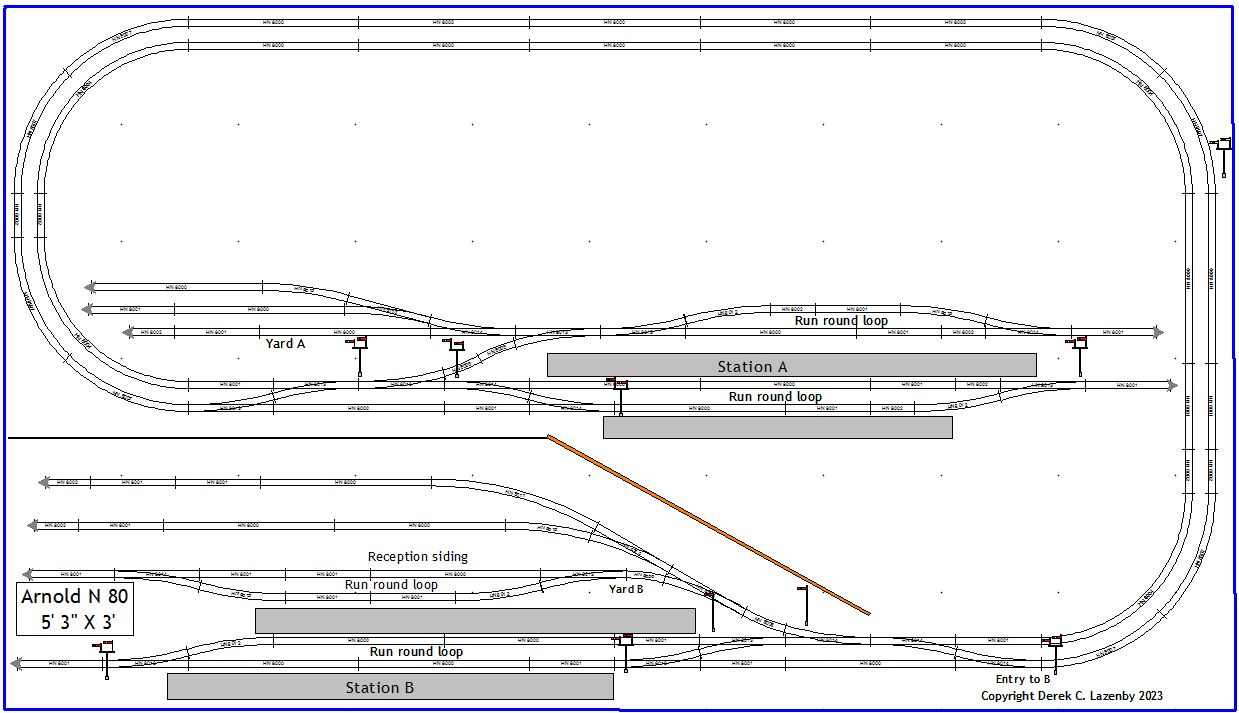
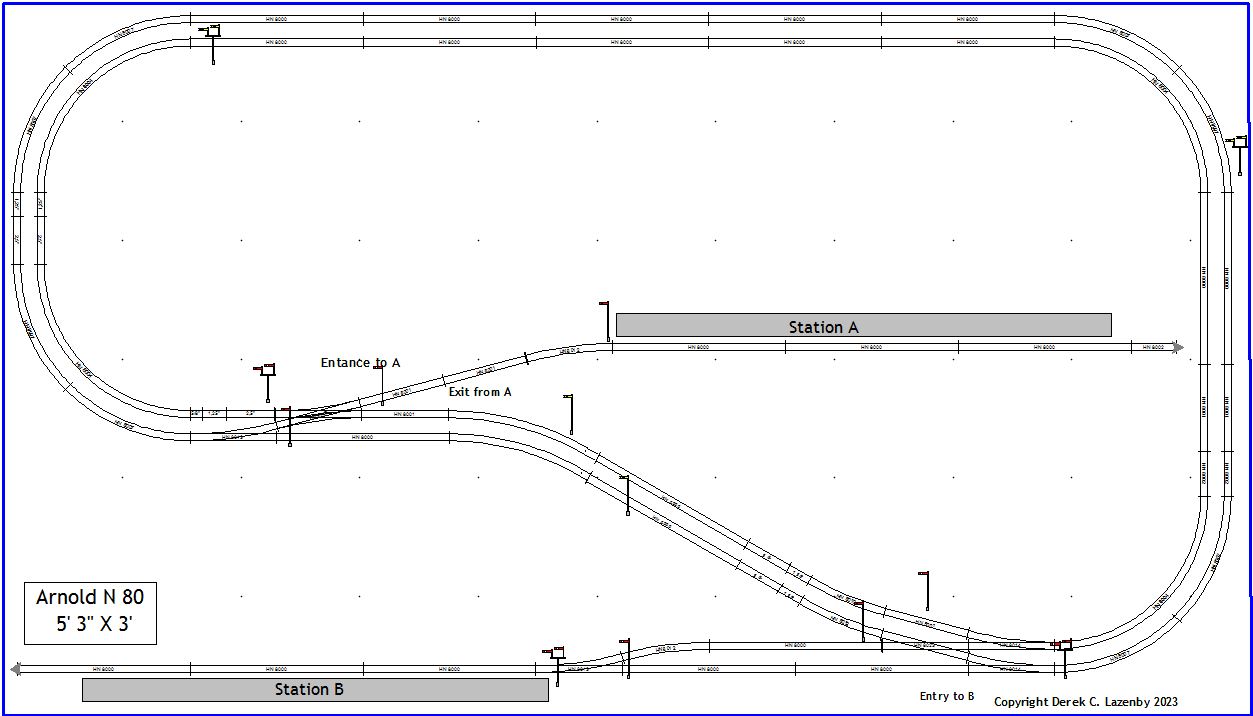
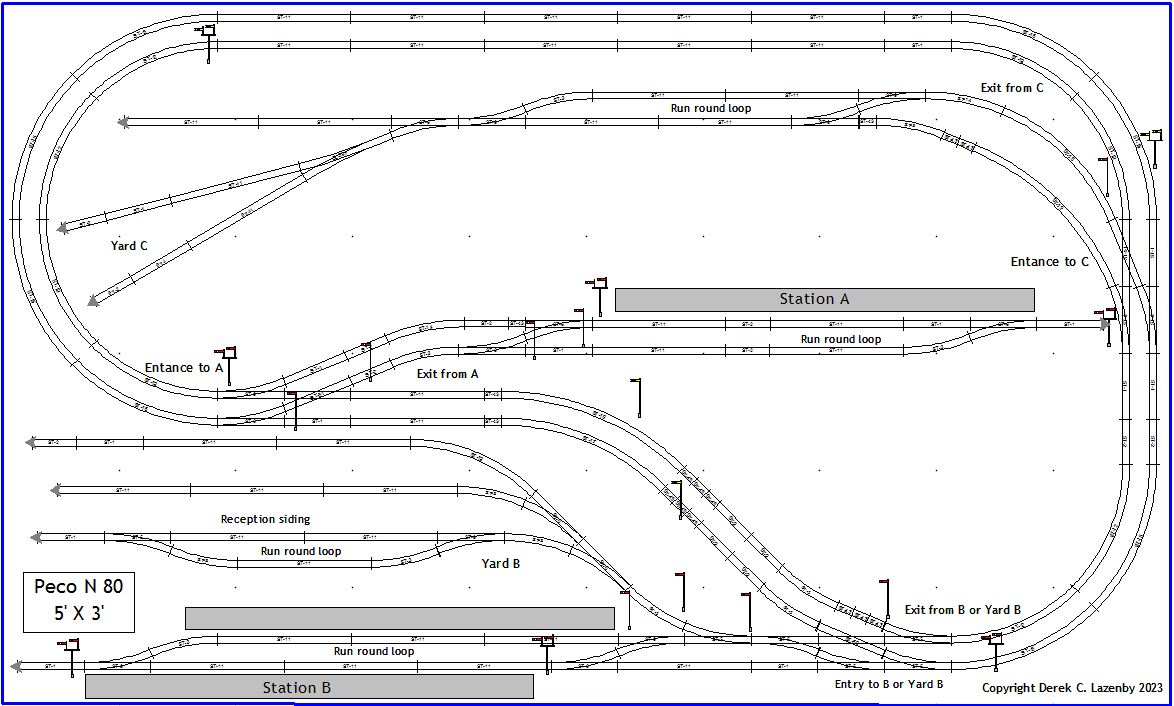
If however we regard the sidings in the previous layout as a goods yard, then the space restrictions are somewhat alleviated. But in that case we need a goods yard destination as goods need destinations just as much as passengers do. This is what the next layout achieves. This will require another controller connected to the entrance to Yard C. The lower track of the run round loop there is also used as the headshunt.

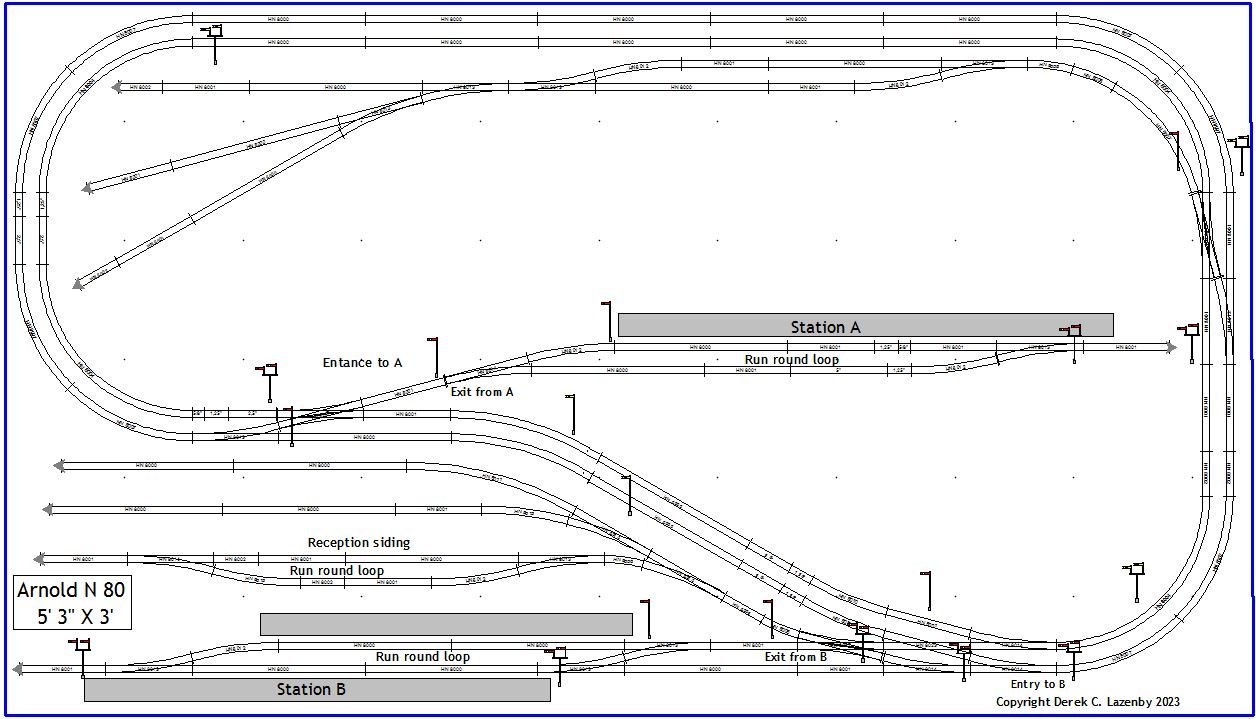
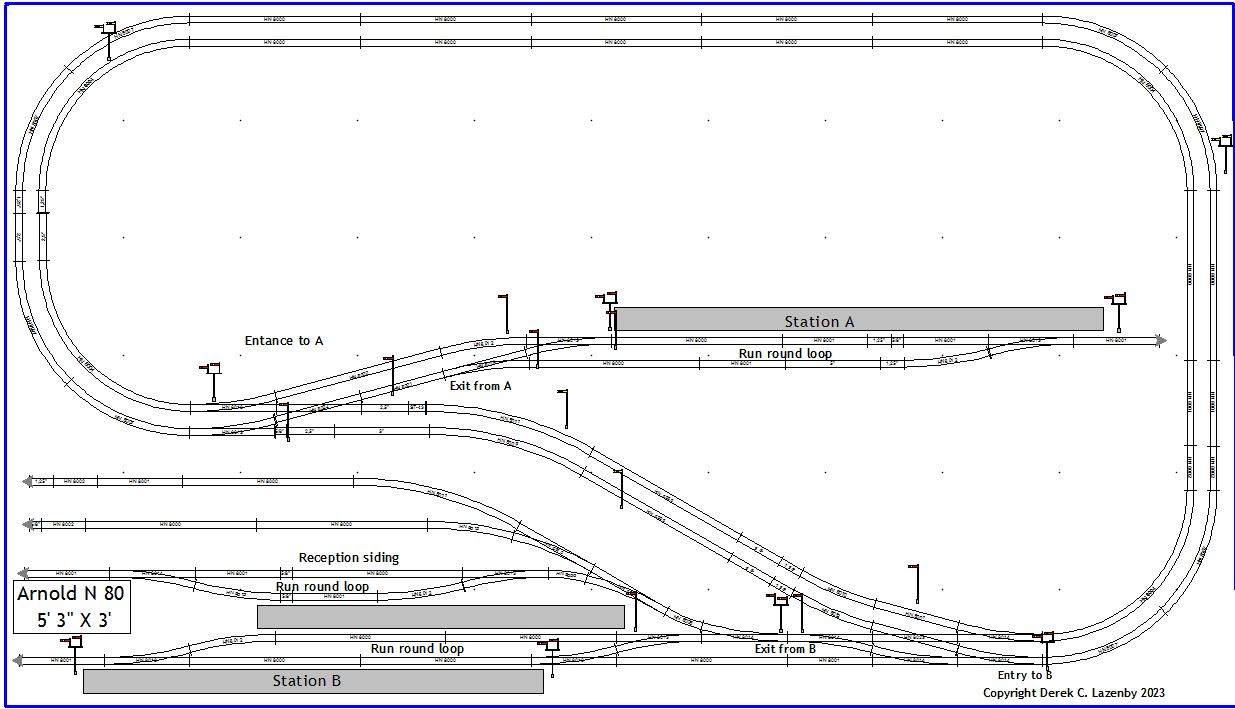
Finally, lets take the first step from toy trains to a model, but that will still leave a long way to go! Firstly, real life does not (normally) include a circuit so we need to get rid of that, but we don't want to throw everything away so lets keep the previous layout but "straighten out" in the Station A area. Straightening out the station also means we can simplify the goods yard and also make it more realistic. Then we can widen the Station B area. What that leaves us with is effectively what is called an end to end layout, except that we have it scrunched up in a spiral! We also have more room for implementing cross overs so we can implement them with just point work. Lastly, it is still all a bit cramped but we can create the illusion of separation by adding a panel in the middle of the layout. This can be decorated to give different backgrounds for the two areas. Note that for the Arnold variants there is no need for short track lengths from other sources.